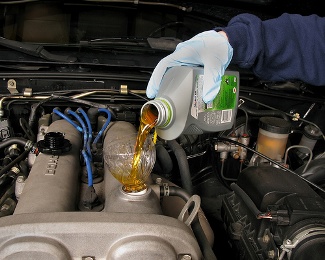
Changing your engine oil is the single most important thing you need to do to ensure your car keeps running. Neglecting to do this can cause your existing oil to turn to sludge, eventually choking and locking up your engine. Oil changes are simple procedures that you can pay to get done in a relatively quick amount of time at your local auto mechanic – but if you’re really interested in saving some money, you can change the oil in your car. All you need is an oil drain pan, a socket wrench, an oil filter wrench, a replacement oil filter and drain plug washer, a couple of bottles of new oil, and some elbow grease.
If you’ve got all that, you’ve got what it takes to change the oil in your car. Here’s how to do it in 10 steps.
1) Park your vehicle on a flat, level surface and be sure to fully engage the parking brake.
2) Pop your car’s hood and remove the oil cap that sits on the top of your engine.
3) Get on your back and slide under the front end of your car, brining your supplies with you (oil pan, socket wrench, rags or paper towels).
4) Locate your car’s oil filter and drain plug, which depending on the make and model of your car may be close together or a bit apart. Both reside on the underside of your engine. The drain plug looks just like a hexagonal shaped screw (meaning it’s got six sides) with a washer below it. The oil filter is cylindrical.
5) Unscrew the drain plug using your socket wrench. Be prepared – once you’ve removed this, the oil will begin to drain out of your engine. Position the oil drain pan to catch the oil and wait until it’s completely drained before replacing the drain plug. Replace the drain plug washer before screwing the drain plug back into place.
6) Reposition the oil pan underneath the oil filter. With your socket wrench, unscrew the oil filter assembly. Again, be prepared for your engine oil to begin pouring out when it’s fully removed. Make sure the rubber ring that sits between the filter and your vehicle doesn’t stick in place. If so, remove it by hand and toss it.
7) Allow the oil to drain into the pan, using a rag or paper towels to clean up the excess oil around the connection point between the filter and your vehicle.
8) Install the new filter – but before you do, use a finger and dab some oil around the circumference of the new filter’s rubber ring. This helps make a better seal. Screw the new filter into place firmly, but not too tight.
9) Check the vehicle’s owner manual for the proper amount of oil to be added to the engine. Crack open your new oil supply and fill your oil tank.
10) To ensure your oil levels are right, run your vehicle for a minute (checking your work by looking for leaks underneath your engine) and then turn it off. Pull out the dipstick and measure your oil levels.
That’s all there is to it. And the best part? You’ve just saved anywhere from $30 to $75 in less than an hour. Now you can go treat yourself to something special instead of sitting in the waiting area of your local auto mechanic, reading magazines and wishing you knew how to do it all yourself.
When you do need more labor intensive repair or maintenance work, use Openbay. Compare pricing from top shops in your area and book service with ease.

